TABLE OF CONTENTS
The organisation settings page can be accessed through the navigation bar. Click on your username at the bottom of the navigation bar which will slide out a secondary menu. From here select "Settings"
You will then find a pop-out which has an "Organisation" sub-heading. From here you can access users and their access rights, customisation of your organisation, and sites.

Users Section
By selecting "Users & Access" under "Organisation" it will take you to the dedicated page, as shown with the example below:

User Details
The "Members" section provides a comprehensive list of all users within your organisation who are registered on the Insytly platform. Here’s how to navigate and utilise this section:
Identifying the Account Owner
- Crown Symbol: The owner of your organisation’s account is indicated by a crown symbol next to their name. This helps you quickly identify who has the highest level of access and administrative privileges.
Viewing Other Users and Access Rights
- User List: Below the administrator, you will find a list of all other users currently in your organisation.
- Roles: There are Owners, Admins, and Members. Admins have most access rights but are not account owners, and Members have limited access rights.
- Access Rights: Each user’s access rights are controlled by toggles that indicate which permissions are enabled or disabled for them. These can be access via the "Actions" column under "Edit User".
- Remove Users: If a user is no longer part of your organisation and needs to be removed, you can do so by selecting the "Remove Access" button located on the right-hand side of the screen under "Actions".
Navigating Access Rights
Click on the the three dots under "Actions" in the table next to the user who's access rights you want to edit, and select "Edit User".
The pop-out is shown below:

The permissions which can be granted to users by enabling/disabling the toggle buttons:
- View Dashboard
- Edit Dashboard
- View Comparison
- Edit Comparison
- View Switches
- Edit Switches
- View Notifications
- View Location
- Edit Device Settings
- Edit Geofence
- Add Devices
- Edit User Permissions
Organisation Invites
The "Members" section allows you to invite new users to join your organisation on the Insytly platform.
Inviting a User
To invite a new user to your organisation, follow these steps:
- Select the Invite User Button: Input the user's email address into the designated field.
- Send Invitation: Click the "Invite User" button to send an invitation email to the user, prompting them to create an account.
Open Invitations
- View Sent Invitations: Under "Invites," you can see the email addresses of users who have been invited to join your organisation.
- Pending Status: These invitations will remain listed here until the user accepts the invite and creates an account.
- Remove Invite: To delete an open invitation, click on the red bin icon next to the invite. A confirmation pop-up window will appear, allowing you to confirm the deletion.
Post-Acceptance
- User Details: Once the user has created an account, they will appear in the "Members" section as a validated member of your organisation.
- Set Access Rights: You can then configure their access rights on the platform using the toggle buttons under the Actions section.
External Access
The "External Access" section allows you to view and invite users which you only wish to have specific asset or site access.

Inviting a User
To invite a new user to a specific device or site, follow these steps:
- Select the Invite User Button: Input the user's email address into the designated field within the pop-out.
- Enable or Disable Site Toggle: If you want to invite a user to a site, enable the "grant full site access" toggle button. Leave this disabled if you wish to only invite to a specific device.
- Search Device or Site: Search for the device or site you wish to add the user to and select it in the list.
- Send Invitation: Click the "Invite User" button to send an invitation email to the user, prompting them to create an account.
Open Invitations
- View Sent Invitations: Under "Invites," you can see the email addresses of users who has been invited to join.
- Pending Status: These invitations will remain listed here until the user accepts the invite and creates an account.
- Remove Invite: To delete an open invitation, click on the red bin icon next to the invite. A confirmation pop-up window will appear, allowing you to confirm the deletion.
Post-Acceptance
- User Details: Once the user has created an account, they will appear in the "External Access" section as a validated member.
- Set Access Rights: You can then configure their access rights on the platform using the toggle buttons under the Actions section.
- Remove User: You can remove an external user at any time by selecting "Remove Access" under the Actions column within the table.
Customisation
By selecting "Customisation" under "Organisation" it will take you to the dedicated page, as shown with the example below:

Organisation Details
The "Organisation Information" section provides essential information about your organisation. Here's what you can find and do in this section:
Organisation Name
This is the name of your organisation, which was established when the organisation was created.
Organisation Owner
This field displays the email address of the administrator, who is also the person that created the organisation account.
Organisation Icons
- Replace Logos: You can customise the platform by replacing the default Insytly logos with your own organisation’s logos.
- Organisation Icon: This icon appears in the top left of the navigation bar on the platform.
- Organisation Large Icon: This larger icon is displayed on the Mission Control page, located at the bottom right of the screen beside the KPIs and above the timestamp. This allows you to set a full-sized logo for your organisation if desired.
The file sizes and resolutions needed for the logos are specified within the platform.
Organisation Media
In the "Organisation Media" section, you can upload various types of media for your organisation. Here's how to use the available options:
Upload Device Icon
- Custom Icons: Click the "Upload Device Icon" button to upload custom icons for your assets, replacing the default Insytly icons.
Upload Other Media
- Additional Images: Use the "Upload Other Media" button to upload images, such as photos of your assets, which can be added to your dashboards for better visualisation.
Managing Uploaded Images
- Remove Images: To delete any uploaded images, click the red bin icon located in the corner of the image.
Sites & Access
Under the "Sites & Access" section of the settings you can find all your created sites.

Here you will find a table of site names, how many devices are added to a site, how many external users there are on a site, and actions to edit or delete a site.
You can also search for a site and create a new site.
Create a Site
Create a new site by selecting the button in the top right hand side.
This will open a pop-out window for you to enter a site name and select its tag colour.
Once you have done this select "Create Site" and it will be added to the table.
From here click on the three dots under the "Actions" column and select "View & Edit" to add devices and users to a site.
View and Edit a Site
Under the View and Edit section you can edit all the details for a site, add external users and add devices.
Site Devices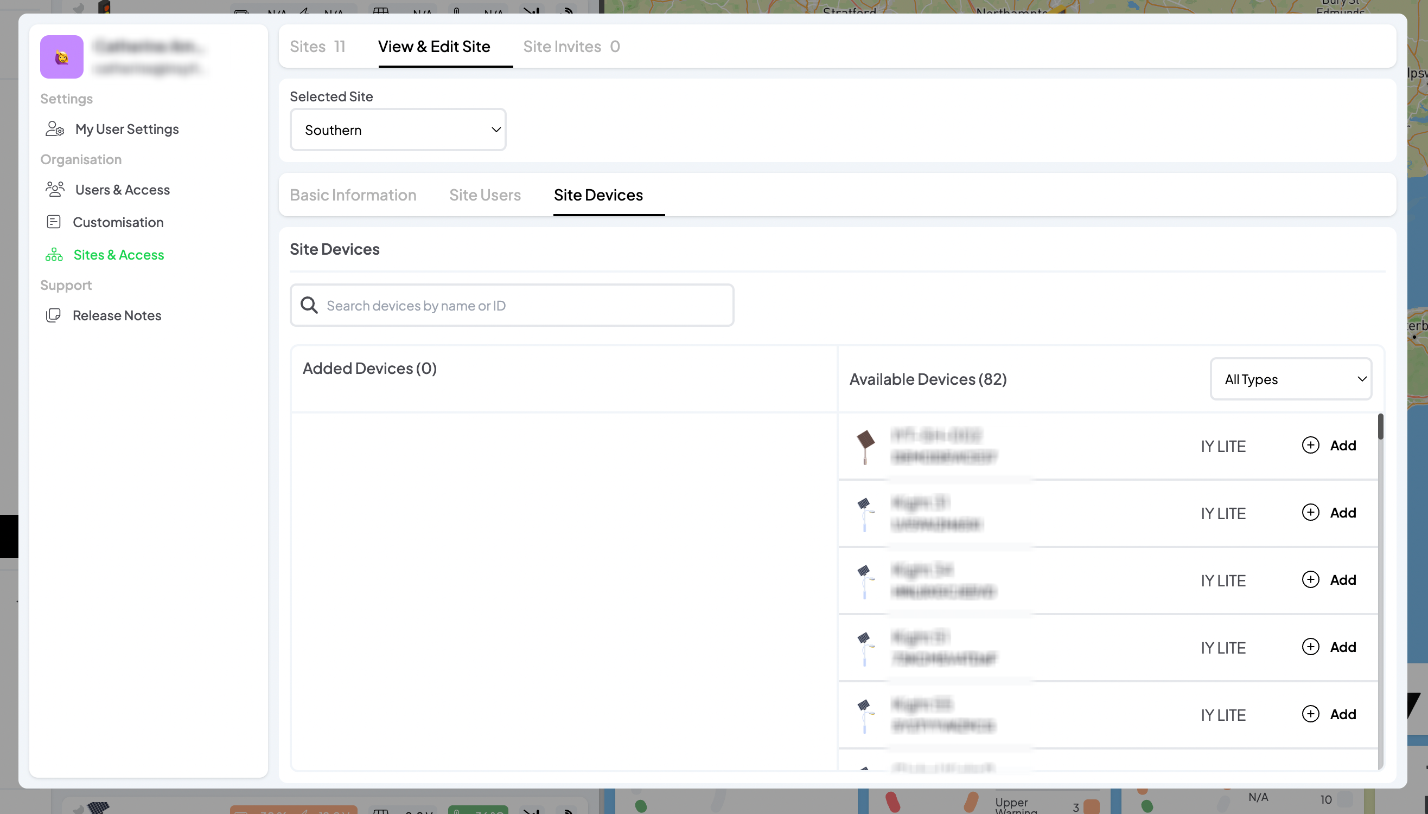
From this section you can view which devices have been added to a site and add any devices.
To add a device, simply search or scroll the list of available devices and click on the Add symbol beside the name.
The type of device can be filtered with the drop-down list.
You can remove a device by selecting "Remove Device" beside the name of the device within the "Added Devices" list.
Site Users
Users can be added to a site in the same way as they can within the main Users & Access section.
Delete a Site
A site can be deleted under the "Sites" section by selecting the three dots under "Actions" and selecting "Delete Site".
This cannot be undone, so please be sure you wish to delete a site before proceeding.
Was this article helpful?
That’s Great!
Thank you for your feedback
Sorry! We couldn't be helpful
Thank you for your feedback
Feedback sent
We appreciate your effort and will try to fix the article